Network address translation (NAT) is one of those rare information technology buzzwords that do exactly what its name implies. In this case, it translates one network address into another network address. The most popular use for NAT is to connect an internal network to the Internet. The proliferation of hosts that now connects to the Internet is causing a shortage of IP addresses, so NAT is a key tool for connecting corporate networks using private IP addresses to the Internet. Since Cisco provides the bulk of the routers that connects to the Internet, we’re going to show you how to set up NAT using the Cisco Internetwork Operating System (IOS).
Understanding NAT
Using NAT to connect to the Internet allows you to:
The most difficult part of using NAT in the Cisco IOS is getting a handle on these four key terms:
·Inside Local—This is the local IP address of the private host on your network (i.e., your PC’s IP address).
·Inside Global—This is the public, legal, registered IP address that the outside network sees as the IP address of your local host.
·Outside Local—This is the local IP address from the private network, which your local host sees as the IP address of the remote host.
·Outside Global—This is the public, legal, registered IP address of the remote host (i.e., the IP address of the remote Web server that your PC is connecting to).
My first reaction after reading Cisco’s definitions for these terms was nearly total confusion, so don’t feel bad if you feel the same thing. But after seeing a diagram of these terms, it started to click for me. Take a look at Figure A for a logical diagram of these terms.
Figure A
Configuring NAT
To configure the standard NAT scenario I mentioned in the opening paragraph, refer to Figure B and then look at the simple steps that need to be taken if you are using a Cisco router between your local network and the Internet.
Figure B
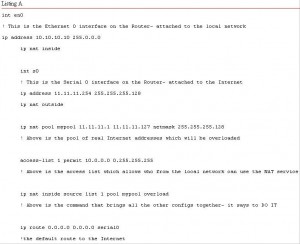
Listing A shows the resulting configuration for the router. One way to examine this on your router would be to issue the command show run.
More Notes:
How is this Possible?
This configuration would allow any host on your local network (such as a desktop PC) to connect to the Internet using the single registered IP address that is being overloaded. Thus, any traffic from that local PC will have the source IP address of the router’s external interface.
If you think about this for a minute, you might wonder how multiple hosts can share the same IP address in the overload configuration, since we are taught that one IP address is assigned to one host and there is no sharing (any more than there is sharing of a social security number).
The answer to that question is that NAT gets around this rule by making an entry in a translation table for every host using a port. In this translation table, there is a map between the inside local, a port on the inside global, another port on the outside local and the outside global. By assigning these ports and keeping track of them in the table, the router is able to “overload” a single IP address with multiple hosts. This allows them to share a single IP address among them.
No comments:
Post a Comment